Monday, August 23, 2010

Keep Calm and Carry On


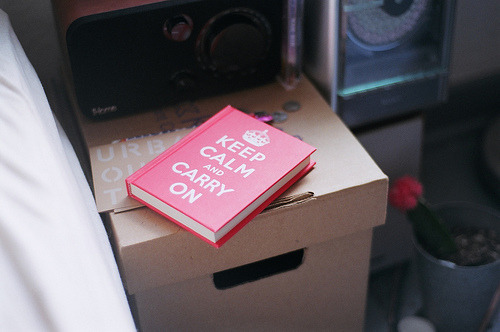
I'm always seeing this phrase all over the internet - on posters, books, t-shirts. But I never knew what the story was behind it. It was only when I stumbled across this website that I found out. This is going to be a bit text heavy, but I urge you to persist, it's just so interesting if you're a bit history obsessed like me!

Turns out that it's actually related to World War II. The Ministry of Information was formed by the British government in WWII, and was the department responsible for publicity and propaganda. After the outbreak of the war, the Ministry of Information produced a number of posters that were designed to boost morale. The first two posters featured King George VI's crown and featured the phrases 'Your Courage, Your Cheerfulness, Your Resolution will Bring Us Victory' and 'Freedom is in Peril'. They were displayed all over Britain.

'Keep Calm and Carry On' was the third poster, and it was planned to be put up once Germany invaded Britain. Since this didn't happen, it was never displayed publically. All the 'Keep Calm and Carry On' posters were believed to be destroyed at the end of the war, but 60 years later a bookseller discovered a poster in a pile of old books (I love when things like this happen!) he'd purchased from an auction. There are also a few displayed in British museums. And since copyright on works created by the British government expires after 50 years, the poster is has been reprinted and inspired all sorts of products.

I think I'm going to have to buy a poster now, cause of the history behind it as well as the fact that I really like the phrase. Have a look over here, it's a site that sells all sorts of Keep Calm and Carry on products, t-shirts, books, posters...even chocolate bars. It sells pretty much everything actually :).

Monday, August 2, 2010

Very nearly sixteen.


It's my birthday quite soon, on the 5th of August. I'm just starting to get excited. I love birthdays, just everything about them :). And of course, you can't have a birthday without a wishlist:

• Matt Smith as Doctor Who poster
• Leather satchel
• Cuckoo clock
• Map of the world (has anyone else noticed how good they look on walls? It's also to motivate me to get to the places I want to go to once I've finished school)
• A good book or two
• Vintage camera to add to my very small collection of three
• Typewriter
• More pretty tights
• Matt Smith to jump out of one of those huge novelty cakes
•Doctor Who + Harry Potter DVDs wouldn’t go astray either...

Wednesday, July 28, 2010

A Field Guide to Typestaches


So I'm pretty sure I need this print! You can buy it over here.

Sunday, July 25, 2010

My Birthday Wish


I love birthdays. Everyone is always happy. I love choosing or making presents and wrapping them just as much as I like receiving them, maybe even more.
What's your favourite thing about birthdays?

Lovely photos by Mario Leko.

Sunday, July 18, 2010

Bedroom Prettiness


The incredidbly pretty bedroom of Jessica. I never ever tire of looking at photos of bedrooms.

Sunday, July 11, 2010

Rainbow Cake


I've been wanting to attempt this cake for a while now, and my friend's birthday was yesterday, so...I made her a cake :). I was a bit worried about how it was going to turn out, since I'm not exactly known for my baking skills, but it actually looked and tasted pretty good!

If you have time you should definitely try it out, cause the end result is pretty cool!

Here's the recipe I used, which I found along with the video over at Whisk - Kid. Things in italics are what I've written.

White Cake
2 sticks (226 g) butter, room temp
2 1/3 cups sugar
5 egg whites, room temp
2 tsp vanilla
3 cups flour
4 tsp baking powder
½ tsp salt
1 1/2 cups (355 g) milk, warmed for 30 sec in microwave to bring to room temp
Red, orange, yellow, green, blue and purple GEL food coloring. Liquid will not be vibrant enough! I actually just used normal liquid food colouring, and it still turned out really well, so don't fret if you don't have gel food colouring.

Preheat the oven to 350F degrees. Oil and line how ever many 9” cake pans you have (I have three and I just reused them).

Sift together the flour, baking powder and salt. Set aside.

Cream the sugar and butter, then add the egg whites (I cracked them all into one bowl) and add them a little at a time. Add the vanilla and mix until fully incorporated. Then, alternating between wet and dry, add the milk and flour mixture in two parts.

Divide the batter amongst 6 bowls (I did it by weight. Weigh your mixing bowl before you begin adding ingredients and then subtract the weight of the bowl from the final measurement after the batter is completed. Divide that number by six and add that weight of batter to each bowl), and then whisk a fair amount of the appropriate food color into each bowl. Pour into the pans and bake for 15 minutes each.

When you remove them from the oven, let them rest on the cooling rack, in the pan, for ten minutes. Then flip, cover, and stash them in the fridge to cool quickly.

Lemony Swiss Meringue Buttercream
You're meant to use this to fill the spaces between each of the six cakes and to frost with. I didn't use it at all though, I just 'stuck' the cakes together using whipped cream, and frosted with ordinary icing. Still, I thought you might like to try it :).
I made this recipe twice today because I underestimated the amount of buttercream I would need/ I would recommend that you do the same because you would need a HUGE bowl to make this much buttercream at one time!

To fill and crumb coat:
9 egg whites
1 ¾ c (350 g) sugar
4 sticks (532 g) of butter, room temp
2 tsp lemon extract

To frost:
5 egg whites
1 c (200 g) sugar
2 sticks (226 g) butter, room temp
1 tsp lemon extract

Cook the egg whites and sugar in a small saucepan over medium heat, whisking constantly, until the sugar is completely dissolved (test by rubbing some between your fingers. If it's completely smooth, it's done). Pour into another bowl (a stand mixer is preferable) and whip on high speed until room temp. Then, on a medium-slow speed, add the butter, waiting until each piece is completely incorporated before adding the next. After all the butter has been added, turn the mixer back to high speed and whip until it has come together, about five minutes. Add the extract, beat briefly and then use.

If the buttercream seems soupy after all of the butter is added and does not come together after whipping, refrigerate for 5 to 7 minutes and continue whipping until it becomes fluffy and workable.


This video is kinda like a very quick how to..

Monday, July 5, 2010

Another Day, Cloudy Memory


A couple of weeks ago my Mum and sister spent the day in one of those little historic towns, and they brought me back this lovely diary :). Just as well as the one I'm using at the moment is about to run out. I love it, looks like an old book don't you think?

Sorry about my dodgy photos. Last two by me and first via here.

Saturday, June 26, 2010

Aidan Knight


A cute little video by a singer that my friend recently introduced to me to, Aidan Knight. A singing, Where The Wild Things Are reading, guitar playing, cereal eating boy. What's not to love?

Thursday, June 24, 2010

Lists


I'm a bit obsessed with cute lists. Particularly ones that are about the best but little things in life. Cause they make me smile. Today my friend and I wrote one similar to the first list, in my Geography book. It goes a bit like this...

My ideal husband would be:

  • Guitar playing
  • Curly haired
  • Not overly muscular
  • Into good music - anything but screamo and rap
  • Never ever on purpose wear pants that are always falling down
  • Cereal eating (I'm not quite sure why my friend wrote that one)

What do you like to write lists about?

Sorry I've been such a bad blogger! I just haven't really had anything to blog about, but now I have quite a few ideas :).

Images via, you guessed it, we heart it.

Sunday, June 6, 2010

Little Miso

I was looking on Just B the other day when I came across a post about Janice Law. I was very happy to have found it (thank you very much Just B!) because when I did, I discovered the wonderfulness of Little Miso. I fell in love with all the jewellery Janice makes, particularly the 'Peepos'. I'm going to have to get one as a ring, they are so so cute.
Make sure you check out her Etsy!


Monday, May 31, 2010

Shoe love


Doc Martens (I always think of the TV show Doc Martin whenever these are mentioned).


Converses are quite possibly the best, most comfortable shoes ever.


I got the most lovely oxford type shoes at Sportsgirl in Melbourne :).


Do you have a favourite type of shoe/pair of shoes?

Friday, May 28, 2010

A cup of tea


All I feel like doing at the moment is snuggling down under a doona with a nice cup of hot chocolate or tea. And then spend the next few hours reading and looking at pretty pictures on my favourite Tumblrs. Sadly I am at school at the moment, and when I get home I will have to do my English assignment. I cannot wait for the weekend. I do have a Geography test to study for, but I'm planning to do that with my friend, so it's ok, cause I love our little 'study sessions'.

What are you all doing this weekend?

P.S. I wish I had this mug. I have loved Eeyore for 23923948230492 years.

Tuesday, May 25, 2010

Paola Zakimi


Cute prints and paintings by Paola. I love the last one for some reason, I think it's the little details in her hair.

Friday, May 21, 2010

Things I love about winter


Lying in bed whilst reading, writing or looking at pretty things/Facebooking on my laptop.


Hot chocolate (and how cute are those marshmallows?).


Berets.


Knitted jumpers.


Ok, so I know a few things you can do at anytime, I just think they're better in winter. I must alos mention I love the fact I can get onto my blog and wonderful sites like Tumblr at school now. Helps pass time well...

Btw, you should all check out my lovely friend Blair's blog/site - click here. I think you will quite enjoy it :).

P.S. Images via we heart it. Tell me if you know a more specific source.
Sources: 2 & 5.

Friday, May 7, 2010

Cross your fingers


I wish my wardrobe looked like this. Have a look at more lovely things over here.

Sorry for the lack of blogging. Hopefully I'll blog more regularly now :).

Saturday, April 24, 2010

Some fantastic foxes


How cute are these fox pillows by Elsie? I found them over at What Anna Loves, and now I'm inspired to make some cushions, pillows, whatever, of my own. I'm just not sure where to begin. Instead today I went hunting for white tights (unsuccesfully) then came home and read. I'm in a very lazy mood, I'm very grateful for the three day weekend, I will be needing it for homework!

What are you all up to this weekend? :)

Tuesday, April 20, 2010

How to make bunting

The other day, my friend and I decided to make bunting for our rooms. After a bit of googling, we proceeded to follow the instructions that were on someone's website, but since they weren't really working out for us, we decided to just see how we went by ourselves. And this is how we did it, pretty simple really..

You will need:

Material - You can have as many or as little different types as you want. It depends if you want to follow a pattern (e.g. blue, green, yellow, pink, blue, green, yellow, pink..) or if you want to have a different type for each triange.
Ribbon or twill tape (I used two metres and it fit 15 triangles, also make sure it's thick as it just makes it easier).
Cardboard (template).
Scissors
Pins
A pen
And finally you will need a sewing machine.


Step One: Make a triangle template using cardboard. It can be as big or as small as you want.


Step Two: Place your template onto your material and trace around it. Now you can cut it out. Repeat this on all the different materials you're using.


Step Three: Fold the twill tape/ribbon in half and iron along it so it stays like that.


Step Four: Lay out the tape/ribbon and arrange the triangles to your liking. Make sure they're nice and secure between the fold of the tape/ribbon, and then pin them into place.


Step Five: Sew along the bottom of the twill tape/ribbon, close to where it meets the triangles. You can tuck in the ends of the tape/ribbon to make it more neat.


Step Six: Now that it's all sewn, you can iron it, just to get rid of all the creases and other little annoying bits.

And you're done! :).

Wednesday, April 14, 2010

Anna Hatzakis

I found Anna Hatzakis via Daydream Lily a while ago, just thought I'd share a few of my favourite photos by her with you.


Also I still need two or maybe three more people to participate in the art swap, all you have to do is make one arty type thing and you'll get 36 in return! Please leave a comment with your email if you want to join in :).

Followers

Views

 
Related Posts with Thumbnails

Ducks Like Tea Copyright 2009 Shoppaholic Designed by Ipietoon Image by Tadpole's Notez and edited by Kaytee at Ducks Like Tea. Header image by este pequeño corazón.